


The Novak Guide to Installing
Ford OHC 2000cc / 2300cc Engines
into
Early Jeeps

The Ford OHC I4 engine remains a popular conversion engine into early CJ Jeeps (1946-1971) and can be successfully done in a mechanically clean and financially affordable manner. This conversion is ideal when replacing the L & F Head 134 engines.
Though it is possible to perform this conversion into the larger Utility Truck & Wagons, these Jeeps are better matched with V6 or V8 power, due to the weight of these Jeeps.
A Little History
The "Pinto" engine began life as a 1.6L in 1970. The 2.0L version was introduced the following year in the Pinto and Capri. In 1974, a 2.3L version was released and it was built in various forms up through 1997, with a 2.5L variation built for the Ranger from 1998-2001.
New engines are actually still available from Ford Power Products.
The engine is generally respected for its power output, longevity and efficiency.
The T90 Transmission
This swap is designed only for the Jeep T90 transmission. It is a very durable transmission, when well maintained and very well suited for any amount of power the Ford I4 can generate.
Transfer Case
 The Dana Spicer Model 18 is ideal and very easily retained for this conversion.
Engine Choice
The biggest difference between the 2000 and 2300 cc engines (as far as the conversion into a Jeep is concerned) is oil filter location. The 2000 has the filter towards the front of the engine, the 2300 at the back of the engine. The filter is on the drivers side of both engines. The rear located filter on the 2300 will interfere with the stock Jeep steering gear. Even when using the shortest filter available, the 2300 on some military models may require relocation towards the passenger side (common on V8 swaps) or installation of different steering gear. An oil filter relocation kit for some of these engines may be available from TD Performance (www.tdperformance.com) and their distributors.
When "piecing" a standard shift engine together from an engine that originally had an automatic, it will be found that on the 2000 cc engines there was a flywheel change for 1972 and newer engines that consisted of locating the starter ring gear on the opposite side of the flywheel. This necessitated a change in starters also and dictates a 1971 starter be used with the 1971 flywheel. 1971 flywheels and starter will interchange with 1972 and newer units, but both the starter and flywheel must be changed.
Injected vs. Carbureted
 Pick your flavor here. Both carbureted and injected versions of these motors are unusally powerful for four-cylinders. The installer should choose the system that best matches his comfort level and performance wishes.
Engine Placement
The PC2 adapter positions the engine in the vehicle with a slight tilt (about 3 degrees) towards the drivers side of the vehicle. This improves driveshaft to starter clearance and air cleaner to hood clearance. Additional driveshaft clearance can be obtained if necessary by grinding the starter's center bolt, if necessary. However, if your springs are sagging such that the driveshaft does come this close to this starter boss, consider fresh springs or even some moderate suspension lift.
To prevent the engine from interfering with the firewall, it is recommended it be installed 1" to 1-3/4" forward from the original engine's location (using the back face of the block as the datum), or as required. 1" is usually sufficient for the T90.
The engine can now be bolted up to the transmission and the front located for installation on the motormounts while checking clearance between the air cleaner and the hood, as well as front driveshaft to starter clearance.

Engine Mounts

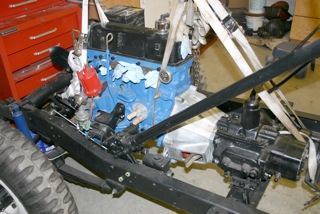
Side view, photo courtesy of customer T. McHugh.
There are several ways the engine can be mounted and the method chosen will depend on tools and equipment available, and whether Jeep or Saginaw steering will be used, as well as the location of the mounting pads on the particular Pinto engine. Motormount location and bolt patterns vary depending on when the engine was made. Because of the number of changes in the Pinto engines, we no longer make motormounts and leave it to the installer to perform this.
The motormounts should be designed to mount the front of the engine as high as possible to provide maximum driveshaft to starter clearance. Keep in mind the difference the weight of the engine and front sheetmetal will make on the "ride height." The springs may be 2" or more up when unloaded. The engine can be as much as 5 degrees high in front when mounted with its weight on the frame.
When building mounts for any four-cylinder engine, the characteristic vibration factor of a four-cylinder must be kept in mind. If the engine is mounted too rigidly, vibration will be transmitted to the frame with resulting inability to keep bolts, etc. on the engine and mounts tight. The ideal set of mounts should be designed with both sides opposite each other on the engine using the original bosses on the engine and soft insulators to absorb the vibration.
 |
 |
 |
 |
 |
 |
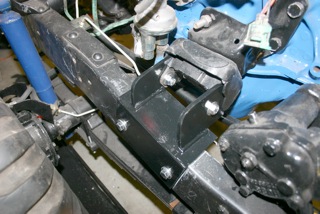
| The images above are courtesy of customer C. Leblanc, who noted the following on a set of engine mounts he devised for his own project: The Jeep fenders have to be trimmed a bit at the bottom to make room for the engine mount. You will also notice that the vertical parts of the engine mount have been shortened a bit with a grinder so that they interfere less with the fenders. |
Clutch

The stock 8-1/2" 4 cylinder Jeep clutch disc is used in the Pinto clutch pressure plate. All other parts are standard shift Pinto, except the pilot bushing supplied with the kit. Be sure to check for flywheel bolt to clutch disc hub clearance. This should be 1/16" minimum. If necessary, grind flywheel bolt heads to provide clearance or use a different make of clutch disc with smaller size hub springs.
Due to variations in clutch hub length in clutch discs of various manufacturers, it is advisable to check for clearance between the clutch disc hub and the pilot bushing. This can easily be checked after the flywheel and pilot bushing have been installed on the engine. Hold the clutch disc with its engine side against the flywheel and use a piece of welding rod with about a half-inch of one end bent at 90 degrees to check this clearance through the hole where the clutch gear goes. There should be a minimum of 1/16" clearance to as much as 1/8" clearance between the hub and the pilot bushing. If clearance is less than 1/16", grind the engine side of the hub to provide the required 1/16 to 1/8" clearance.
Clutch Linkage
With the engine mounted front and rear, the conversion can proceed to the connection of various control systems, etc. The clutch can be connected by two different methods. One way is to use the stock Pinto cable assembly by making an adapter to attach the cable to the Jeep clutch pedal brackets. The other way would be to weld a new arm on the clutch pivot tube about 180 degrees from the original Jeep arm. This converts the linkage to push and a rod can be used to actuate the Pinto clutch. A clevis can be welded onto the rod for clutch adjustment. The Pinto cable throttle setup, complete with accelerator pedal and brackets, works well.
The frame bracket for the clutch pivot tube should be moved forward to match the engine movement. This is done by simply drilling two new 5/16" holes in the side of the frame.
Engine Crank to Transmission Input Shaft Pilot Bushing
 The original "needle type" pilot bearing must be removed from the Pinto crankshaft and replaced with the special pilot bushing supplied with the kit. The original pilot bearing is best removed with the proper puller. Removal of the original pilot bearing should not be attempted with a punch, chisel, or by trying to collapse it by driving something between the bearing and crank bore. The bearing race is much harder than the crankshaft and the bearing bore in the crank will surely be damaged if the proper puller is not used. This could cause problems when the conversion bushing is installed that probably would not show up until after the conversion is running.
Bellhousing

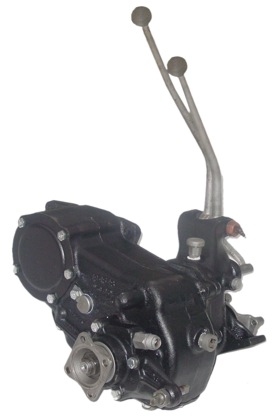
Our Novak Kit #PC2 is for the 4-3/8" (112mm) bellhousing bore engines only. The bellhousing must measure 7" deep, front face to back face. No other bellhousing will work with this kit.
We have seen Ford #'s such as D42A-6394-AA and D52Z-6394-AA as being valid bellhousings for this conversion.
This conversion requires the use of the bellhousings, as pictured, right.
Be aware that the locating bore in the rear of the bellhousing may be out of location by as much as .042" total indicator reading when checked with a dial indicator. Misalignment greater than .005 total indicator reading can cause premature failure of the transmission, clutch disc, and pilot bushing. Unfortunately, few people take the time or have the necessary dial indicator to check for this misalignment. Any misalignment that may exist is due either to faulty machining of the bellhousing by Ford, or damage to the bellhousing from an accident, if the engine was removed from a wreck.
The Adapter
The attaching bolts and studs have been installed by us. The studs are locked into the adapter with Loctite®. The four-stud-side goes towards the transmission. The side with the Novak name goes towards the engine as is held on the bellhousing with three hex-head bolts and the one long stud and nut. If the studs are removed from the adapter for any reason, it is important that they be reinstalled properly and that the studs do not protrude through the adapter.

The Novak #PC2 adapter. It has been reengineered using an integrated steel throwout sleeve, an integrated T90 bearing retainer and is made from a billet of corrosion-resistant aluminum.
Pinto bellhousings feature a plastic transmission shift rail oil seal. This should be removed to insure that the rear mounting face allows the adapter to sit flat against it.
It is recommended that the T90 front felt seal be replaced while it is accessible.
Gauges
Factory Jeep gauges work great with the conversion engine. The installer can thread the Jeep gauge sending units into the proper ports on the Ford engine. Common adapter fittings may be required, and are available from your local parts supplier.
Steering
Factory steering is not contraindicated for the conversion. Saginaw steering may be a worthwhile upgrade. Power steering is an option if one uses the power steering pump that is native to the Ford engine.
Suspension & Engine Weight
For the purposes of the front springs, the engines are essentially the same weight. No changes need to occur here unless the springs are sagging and the Jeep sits too low.
Fuel Delivery
1971 Pinto I4's used a 2" diameter fuel pump and newer engines use a 3" pump. Maximum motormount clearance is obtained when using the 2" diameter fuel pump, if mounting at left front of engine. If mounts are made that use any of the stock mounting pads, then either fuel pump will work.
Electric fuel pumps are simpler and very reliable. One should be chosen that matches the pressure PSI requirements of the carburetor or injection system. An electric pump should be mounted as close to and as low as possible under the Jeep fuel tank, as they are designed to push fuel, not pull it.
Exhaust
The installer should work with their exhaust shop to determine the path the exhaust circuit should follow. Side-exit exhaust on the passenger side is common, as is rear-exit exhaust.
Crossmember & Rear Mount
 The installer can easily retain the factory crossmember and T90 rear mount.
The forward movement of the engine-gearbox assembly is best accomplished by drilling four new mounting holes in the underside of the frame the required amount forward of the original holes. The crossmember is then mounted at this new location. The transmission and transfer case should be mounted on the rear crossmember in the new location prior to assembling the engine to the transmission. This will anchor the rear of the engine in the proper location and will facilitate assembly of the front motormounts.
Driveshafts
The factory driveshafts could be easily modified and balanced by a professional to match the updated transfer case location. Measurements for driveshafts should be taken only when the full weight of the powertrain is on the wheels.
The driveshaft splines may allow for the 1" forward movement of the engine-gearbox assembly. The rear shaft will require no modification. The front shaft should have about 5/8" sawed off or ground off the ends of the splines to eliminate the possibility of the shaft bottoming out in its yoke.
Axles
Factory axles are ideal and there is no reason to change them for the sake of the engine conversion itself.
Linkages
The factory Jeep throttle linkage can be converted to the Ford engine with minimal effort.
Brakes
Factory brakes, if adequate to the driver's wishes before the swap, will be adequate after.
Summary
The "Pinto" swap has nearly been a cult favorite among Jeep engine swappers. It remains a very relevant engine, and can add a very practical or even exciting amount of performance, reliability and fuel economy to an Early CJ.
Sources
- The Novak archives and its years of customer input
- Wikipedia.com
- Ford Power Products
- Tom McHugh's "Pinto Turbo in a CJ-3B" article
